Photography is an art that thrives on light, and perhaps one of the most thrilling ways of experimenting with light is photeeqs lens flare. This beautiful effect has the capability to turn an ordinary image into a sweeping masterpiece, giving it warmth, drama, or a cinematic sheen. Whether you’re a newcomer to the world of smartphones or a pro with a top-notch DSLR, photeeq lens flare is something to learn. In this in-depth 3,000-word manual, we’ll discuss the whole shebang of photeeqs lens flare, from what it is to how to produce, manage, and augment it. We’ll also explore its uses in various photography types, mistakes to steer clear of, and answer 10 FAQs to assist you in mastering this technique. Let’s begin!
Table of Contents
Understanding Photeeqs Lens Flare: What Is It?
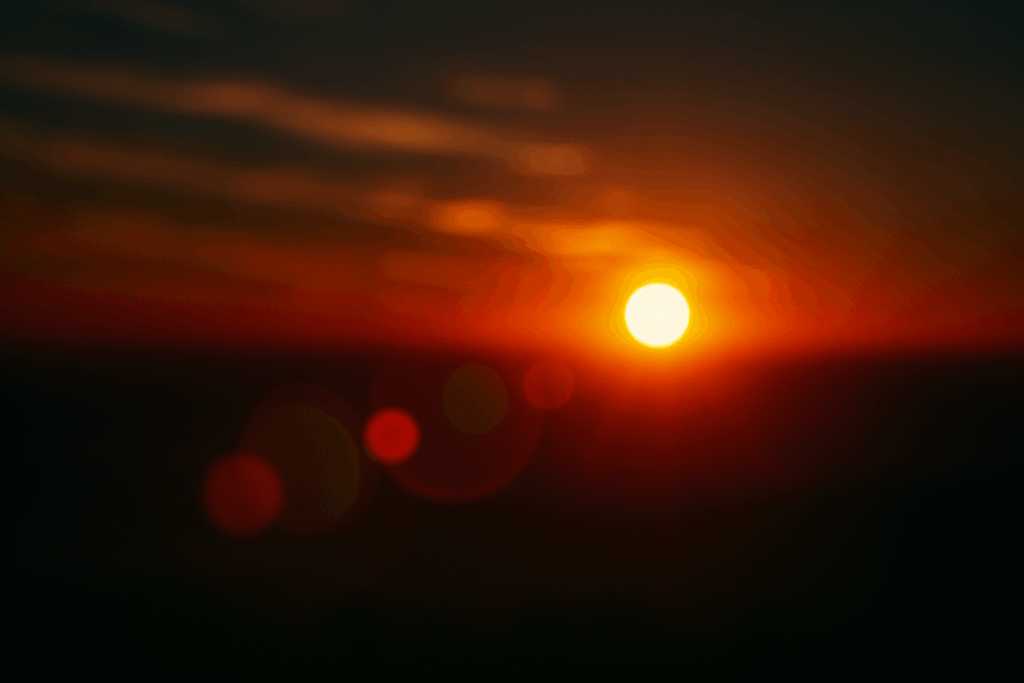
In essence, photeeqs lens flare happens when light gets scattered or reflected inside a camera lens element, producing visual anomalies such as bright spots, streaks, halos, or glowing spheres. This is usually an occurrence when you aim your lens at a powerful light source, whether the sun, a street light, or even a studio light. Some photographers perceive lens flare as a defect that diminishes image contrast, while there are those who consider it as a creative instrument that imparts an element of magic, a mystical, ethereal image to their photographs.
Photeeq lens flare isn’t chaotic random light—its an organized dance of reflections and refractions inside the lens. The flare’s shape, color, and brightness are influenced by things such as the design of the lens, the angle of the light, and your settings on the camera. Used on purpose, photeeq lens flare can create emotion, lead the eye of the viewer, or capture a nostalgic, film-like feel that makes your images unforgettable.
Why Photeeq Lens Flare Is a Game-Changer
So, why should you pay attention to photeeq lens flare? For starters, it’s a versatile effect that can take your photography in infinite directions. It can provide depth to a landscape, create a dreamy haze in a portrait, or add a gritty, cinematic quality to a street shot. Photeeq lens flare is also a sign of mindful photography—it indicates that you know how light behaves when it hits your camera and how to bend it towards your intention.
In today’s visually saturated world, where social media platforms like Instagram and Pinterest are flooded with images, photeeq lens flare can make your photos stand out. Its warm, glowing effects catch the viewer’s eye and evoke a sense of wonder. Plus, mastering photeeq lens flare is a skill that bridges amateur and professional photography, giving your work a polished, artistic flair.
How to Capture Photeeqs Lens Flare Naturally
You don’t require high-end equipment or complex editing techniques to produce photeeq lens flare. With some basic methods, you can obtain this effect directly from your camera. Here’s a starting point:
1. Capture towards the light source
The simplest method of taking photeeq lens flare is by facing your camera towards a light source, for example, the sun. The ideal time to accomplish this is during golden hour, morning or late afternoon, when the light is warm, gentle, and less likely to overexpose your shot. Place your subject so the light enters your lens at an oblique angle, and keep an eye out for streaks, orbs, or halos in your viewfinder. Play around with slight tilts and shifts to regulate the form and strength of the photeeq lens flare.
2. Select the appropriate lens for Photeeq Lens Flare
Not every lens creates photeeq lens flare in the same manner. Prime lenses, with their fixed focal length, are usually ideal because they contain fewer glass components than zoom lenses, which means the flares produced are cleaner and more crisply defined. A 50mm or 85mm prime lens works best for shooting photeeq lens flare on portraits, whereas a wide-angle lens of 24mm can be used to produce flares with drama in landscape shots. When shooting with a smartphone, the camera lens will also cause photeeq lens flare, albeit the effect might be less pronounced.
3. Remove the Lens Hood
Lens hoods filter out stray light, and that’s the one thing you don’t want when going for photeeq lens flare. Take off your lens hood, and more light will strike the lens head-on, making it easier to produce those gorgeous flares. Just watch your overexposure—review your camera’s histogram to keep from losing important details in the highlights.
4. Experiment with Your Aperture Settings
Your aperture setting is a huge factor in the look of photeeq lens flare. The wider your aperture (such as f/1.8 or f/2.8), the more light it allows in, producing soft, diffused flares that easily integrate with the picture. The smaller your aperture (such as f/11 or f/16), the clearer, star-shaped flares with more defined borders. Try adjusting the aperture to discover the photeeq lens flare aesthetic that best represents your vision.
5. Employ Natural Elements to Intensify Photeeqs Lens Flare
You can intensify photeeq lens flare by adding natural elements such as trees, leaves, or windows to your frame. Taking a photo through foliage, for instance, can produce complex patterns of light and shadow, enriching the flare. Taking a photo through a window can also produce diffused, soft photeeq lens flare that provides a dreamy texture to your photo.
Intensifying Photeeqs Lens Flare in Post-Processing
Though natural photeeq lens flare is beautiful, post-processing can amplify it further. Adobe Photoshop, Lightroom, or even mobile apps such as Snapseed provide you with the means to enhance and polish the effect. Here’s how to do it:
1. Adjust Contrast and Clarity
In Lightroom, employ the contrast and clarity sliders to enhance your photeeq lens flare. Adding contrast darkens the shadows surrounding the flare, which creates a more dramatic effect, while increasing clarity pinches the edges of the light streaks. Don’t overdo it—small, subtle tweaks make the flare appear natural.
2. Add Warmth with Color Grading
Photeeq lens flare tends to be warm and golden, particularly in golden-hour or sunset images. In post-processing, this can be enhanced by adjusting the white balance or adding a warm color grade. You can also add a slight increase to yellow or orange tones to make the flare cohere with the rest of the image.
3. Add Subtle Flares with Brushes
If the native photeeqs lens flare isn’t sufficiently powerful, you can add more flares with the brush tool in Photoshop. Choose a soft, rounded brush with low opacity and warm coloring (yellow, orange, or soft pink). Gently paint across parts where the light would naturally strike, feathering the effect into the current flare for a smooth appearance.
4. Apply Lens Flare Overlays
There are many editing software that have lens flare overlay options that you can apply to your photos. These are pre-made photeeqs lens flare effects that you can drag and drop onto your photo. Change the opacity and the blending mode so that the overlay will merge naturally with your photo.
5. Dodge and Burn for Emphasis
Dodging and burning—lightening or darkening individual spots on your photo—can serve to heighten photeeqs lens flare. Lighten the flare with the dodge tool and darken areas around it using the burn tool to create a dramatic contrast that highlights the effect.

When to Avoid Photeeqs Lens Flare
As much as we adore photeeqs lens flare, it’s not necessarily the best option for every picture. Sometimes it’ll draw attention away from your subject or give the photo an amateurish look. Here are a few situations where you may prefer to avoid it:
1. High-Contrast Scenes
In scenes with extreme contrast, like a dark subject against a bright background, photeeqs lens flare can wash out details and make the image hard to read. If you’re shooting in these conditions, use a lens hood or reposition your camera to minimize flare.
2. Product Photography
For product photography, crispness and clarity are of utmost importance. Photeeq lens flare can hide the details of the product, reducing its attractiveness to potential consumers. Avoid variable lighting settings to maintain the item’s prominence.
3. Formal Portraits
Although photeeq lens flare may introduce a dreamy atmosphere to relaxed or creative portraits, it’s usually too distracting for formal headshots. Clients usually desire clean, crisp images for professional purposes, so refrain from flare unless they specifically request a creative aesthetic.
4. Documentary Photography
In documentary or photojournalistic work, photeeq lens flare can take away from the immediacy of the situation. The audience might see it as a creative enhancement rather than an actual depiction of what was occurring.
Expert Tips for Mastering Photeeqs Lens Flare
Photeeq lens flare is all about mastering control. You want the effect to become part of your photo and not overpower it. These are some expert tips to assist you in achieving the ideal flare:
1. Use Filters Wisely
Although filters such as UV or polarizing filters can minimize glare, they have the same effect of diminishing photeeq lens flare. If you prefer to utilize a filter, use a clear protective filter that does not interrupt the light passing through the lens. Alternatively, try specialty filters such as starburst filters to achieve distinct photeeq lens flare patterns.
2. Keep Your Lens Clean
Dirt on the lens is likely to produce artifacts that resemble photeeq lens flare but are ugly and unnatural-looking. Pre-clean your lens with a microfiber cloth and lens cleaner before taking a shot to make sure the flare is planned and pure.
3. Play around with Lens Coatings
Modern lenses often have anti-reflective coatings to minimize flare, which can make it harder to achieve photeeq lens flare. Older or vintage lenses, on the other hand, tend to produce more pronounced flares due to less advanced coatings. If you’re chasing dramatic photeeqs lens flare, try using a vintage lens for a retro vibe.
4. Use Reflections Creatively
Mirror-like surfaces such as water, glass, or metal can enhance photeeq lens flare by reflecting light into your lens. Add these elements to your frame to achieve interesting and dynamic flare effects.
5. Bracket Your Shots
To make sure you get the ideal photeeq lens flare, bracket your shots—shoot multiple exposures at varying settings. This provides you with choices to pick from during post-processing, particularly if the flare throws off your exposure.
Photeeqs Lens Flare in Various Photography Genres
Photeeq lens flare is very versatile and can be applied across various photography genres to create different effects. Here’s how to use it in your work:
1. Landscape Photography
In landscape photography, photeeq lens flare can create a touch of drama and magic in sunrise or sunset photos. Golden flares warm up the natural colors of the scene, pointing the eye towards the source of the light. Take care not to have the flare hide significant details such as mountain tops or horizon line.
2. Portrait Photography
For portraits, photeeq lens flare produces a soft, flattering glows that can make your subject glow. It’s particularly useful on golden-hour shoots, when the flare can create a halo effect around the head of your subject. Place your subject so the light skims over their face to create a dreamy, cinematic feel.
3. Street Photography
In street photography, photeeq lens flare provides a gritty, cinematic touch to cityscapes. Experimenting with taking shots towards streetlights, neon signs, or headlamps of cars at night can create dynamic flares that provide texture and depth to your images.
4. Wedding Photography
Weddings are all about expressing emotion, and photeeq lens flare can provide a romantic, otherworldly effect to your images. Utilize it when shooting during sunset portraits of the couple or when shooting through a window with soft light filtering in. The flare can produce a glowing, enchanting environment that elevates the mood.
5. Fashion Photography
In fashion photography, photeeq lens flare can give your photos a luxurious, editorial look. Use it to emphasize clothing texture or create a glamorous, sun-kissed appearance. Combine it with dramatic poses and bright colors for full effect.
6. Wildlife Photography
Although less frequent, photeeq lens flare can provide a special effect to wildlife photography, particularly when capturing animals outdoors. A discreet flare can highlight the texture of fur or feathers, contrasting dramatically against other elements in the scene.
Common Photeeqs Lens Flare Mistakes to Avoid
Even professional photographers fall into the trap when dealing with photeeq lens flare. Here are some common mistakes and the ways to prevent them:
1. Photeeqs Lens Flare Overuse
Excessive photeeq lens flare overpowers your image and draws attention away from the subject. Seek harmony—utilize the flare to support your composition, not overpower it.
2. Composition Overlooked
Photeeq lens flare must add to your composition, not break it. Ensure the flare works with the lines, shapes, or points of focus in your frame to create harmony.
3. Exposure Overlooked
Lens flare may deceive your exposure meter in the camera, resulting in an overexposed or underexposed photo. Employ manual exposure or exposure compensation to have control over the image brightness.
4. Overediting During Post-Processing
It is easy to overdo while editing photeeq lens flare in post-processing software. Refrain from making the flare look fake by performing subtle moves and blend modes that simulate natural light.
5. Utilizing Low-Quality Lenses
Although any lens can create photeeq lens flare, cheap lenses will create flares that appear muddy or unnatural. Spend money on a good-quality lens for clean, beautiful flares.
Equipment and Accessories to Create Ideal Photeeqs Lens Flare
Although photeeq lens flare is possible with simple equipment, a few accessories and tools will simplify the process and ensure more consistent results:
1. Reflectors
A reflector will reflect light into your scene, making the photeeq lens flare effect stronger. Apply a gold or silver reflector for a warm, golden glow, or a white reflector for a gentle, neutral effect.
2. Anamorphic Lenses
Anamorphic lenses are renowned for creating cinematic, horizontal photeeq lens flare streaks, such as those used in Hollywood blockbusters. They’re pricey, but perfect for photographers who want that cinematic look.
3. Tripods
A tripod would assist you in stabilizing your camera when working with photeeq lens flare, particularly under low-lighting. It enables you to make subtle adjustments in your framing and angles while not concerned about camera shake.
4. Editing Software
Editing software such as Adobe Lightroom, Photoshop, Luminar, or mobile apps including Snapseed is necessary for post-processing and perfecting photeeq lens flare. They provide means to make adjustments in brightness, contrast, and color to achieve the desired effect.
5. Vintage Lenses
Older lenses, with their less complex coatings, usually yield more dramatic photeeq lens flare than contemporary lenses. They’re an inexpensive method for testing unusual flare effects.
FAQs Regarding Photeeqs Lens Flare
1. Why does photeeq lens flare occur?
Photeeqs lens flare results from light being scattered or reflected inside the lens while photographing towards a light source, such as the sun, studio lights, or streetlights.
2. Is it possible to achieve photeeq lens flare indoors?
Yes! You can produce photeeq lens flare indoors with powerful artificial light sources, like studio strobes, lamps, or even a flash camera from a distance aimed at the lens.
3. Does photeeq lens flare affect all cameras?
All but the very poorest cameras, like DSLRs, mirrorless cameras, and even smartphones, can record photeeq lens flare, but the outcome depends on the lens quality and the sensor.
4. How do I prevent unwanted photeeqs lens flare?
To reduce unwanted photeeq lens flare, position a lens hood, change your shot angle, or use your hand or flag to block stray light.
5. Is it possible to add photeeqs lens flare in editing software?
Yes, you can add or enhance photeeq lens flare in software such as Photoshop or Lightroom using overlays, brushes, or lens flare filters.
6. Is photeeqs lens flare bad for photos?
Not always! Intentional photeeq lens flare can be a creative asset, but distracting when it covers necessary details or seems inappropriate.
7. What is the ideal time of day for photeeq lens flare?
The golden hour—early morning or late afternoon—is perfect for photeeqs lens flare shooting because the light is soft and warm and less likely to overexpose your photo.
8. Is photeeqs lens flare available for use in video?
Yes, photeeq lens flare gives a cinematic feel to videos, particularly when capturing with anamorphic lenses or shooting towards bright light sources.
9. How do I achieve a natural photeeqs lens flare look in edits?
Apply soft brushes, warm tones, and low opacity while adding photeeq lens flare during post-processing to blend it naturally with the image.
10. Are there photeeqs lens flare lenses that are specifically made for that?
Anamorphic lenses and classic lenses have a reputation for giving dramatic photeeqs lens flare, but any lens will produce the effect when using the correct technique.

Conclusion
Photeeqs lens flare is a dynamic and all-purpose tool that has the ability to revolutionize your photography, imbuing everything from landscapes to portraits with a hint of magic. By learning to create, control, and maximize photeeqs lens flare, you can take your images to the next level and make them noticed in a sea of visuals. Whether shooting golden hour, creating the effect with vintage lenses, or refining the effect in post-processing, photeeqs lens flare has endless creative potential.
Up to harnessing the strength of photeeqs lens flare? Take out your camera, locate a source of bright light, and begin experimenting. Post your findings on social media or in the comments section below—we’d love to see how you create this effect in your photography!